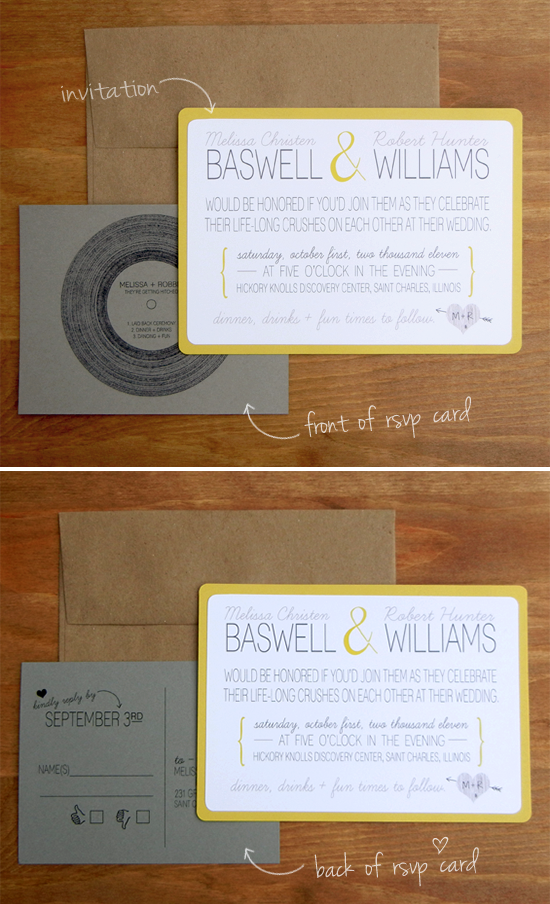
It's been quite a while since my last wedding post, so I thought it was about time that I share our invitations with you! I knew that I'd be designing them myself from the moment we started planning, but we'd initially intended on having them printed elsewhere. As time went on and we started working on our endless DIY projects, we decided to print and assemble them ourselves as well. I won't lie - it was majorly time consuming. But we saved a ridiculous amount of money, even with the costs of high quality papers and archival inks. Most importantly, it made us both really happy to know we did them ourselves from scratch.
To make the invitations, I first designed them in Photoshop. My goal was to create a typographic design that incorporated our colors, yellow and gray. Robbie and I agreed that we wanted a somewhat minimalist design that was fun and expressed our personalities. I'd designed a "logo" for our wedding that featured a wood grain heart and arrow with our initials, and I added that to the bottom right corner. For the RSVP card design, we decided on postcards. This saved money and created less waste. We also wanted to forgo a formal, traditional reply and replace it with something more "us," so I came up with the idea to use thumbs up and down symbols instead. The design on the front of the RSVP cards featured a vinyl record with our names as the album title, and our plans for the evening as the songs.
To create the invitations, we first printed them with archival inks on acid free matte photo paper (two per page). We then cut them with a paper cutter, and used a corner rounder to give the corners a nice finished look. For the backing, we chose a beautiful yellow cardstock from Paper Source. We rounded the corners on the cardstock, then used permanent double-sided scrapbook tape to adhere the printed invitations to the backing. For the RSVP cards, we printed them on gray cardstock (also from Paper Source), double sided, four per page. We used the paper cutter to cut them out and slapped on some pretty postcard stamps. To spruce up the packaging, we cut strips from kraft paper cardstock, wrapped them around the invitations and reply cards, then used double-side scrapbook tape to close the ends of the strips.
Finally, we inserted the finished invitations into A7 kraft paper envelopes, and attached clear return address labels that I'd designed with our "logo" and fonts that matched the invitations. I hand-addressed each of them with a nice felt-tip art pen, added stamps, and off they went to our guests! I may or may not have had several bad dreams that involved cardstock and jammed printers over the course of the project, but in the end, it was totally worth the time and effort to design and hand make our own invitations. (*I also ended up designing and making the programs and menu cards, but we'll save that madness for another post.)
It's Monday! Booooo. Only five more days 'til the weekend.
PLEASE NOTE: Although we're happy to share our method for creating DIY wedding invites, the designs themselves were created to be one-of-kind. We spent a great deal of time brainstorming, sketching, and designing to come up with something that would be uniquely "us." Please feel free to be inspired by our designs and to use the same method for putting your invitations together. But we ask that you do not recreate exact copies of them. Like the other images and design work on this blog, they are copyright protected. Thank you for your understanding and respect of how special these are to us. :)
 |


I LOVE them! The record is perfect!
ReplyDeleteThese are such a fantastic design and the colors are great. i would be so nervous in printing my own invites but it would be so much cheaper!
ReplyDeleteHugs - Brandi
via Blogging Buddies Team
Oh my gosh these are so awesome! The design is so modern and hip and I love that you did them all yourself. If I got a wedding invite like this in the mail I would be pretty psyched to go to the wedding. :-)
ReplyDeleteI love the words, especially "crushes" : )
ReplyDeletei love these!! one day if i get married I want to make my own invites. yours are so personal and cute. i hate how formal most invites are!
ReplyDeletebrittany
prettylittlevintage
Thanks so much you guys! I'm glad I finally got around to sharing them. ;)
ReplyDeletexo,
melissa
Absolutely adorable! I'm a little too young to be married (about to turn 18!), but I can't wait to do all kinds of adorable DIYs for my wedding!! Your cute little invites are definitely some great inspiration!
ReplyDeletei can tell they were time consuming to design, & put together. they turned out fabulously, a wonderful expression of both of you!
ReplyDeletethese are gorgeous. you can really do no wrong with brown craft paper!
ReplyDeletejust started following your blog! definitely stop by sometime & say hi back, even follow if you fancy : ] cheers!
http://bridgetfossedal.blogspot.com
I love these! And I like that you chose non-traditional wording. Our wedding was at a hotel and I felt like I "had" to be more formal on ours, so I'll just live vicariously through you for a second. :-)
ReplyDeleteThese look incredible!! It might have been a lot of time and effort but they are so worth it!
ReplyDeleteI love, love, love your invitations!!! Great job. & congrats!
ReplyDeleteYour wedding invitations are awesome! You are an inspirations to brides everywhere!
ReplyDeleteWonderful! I too am a designer. Here are a few of my invite projects: http://obsessivision.com/projects/shower-invite/ http://obsessivision.com/projects/the-invitation/
ReplyDeleteThese are sooo awesome!!! Do you do custom invitation design for others? I sure would love for you to do ours!
ReplyDelete